Milwaukee Packout in Canada: The No-Nonsense Guide to Building a Smarter, Tougher Modular Tool System
If you work with your hands in Canada—on a frosty slab in Edmonton, a damp dock in Halifax, or a tight condo job in Toronto—you already know how much time vanishes to hunting for parts and hauling the wrong gear. The Milwaukee Packout modular storage system promises to fix that. Not with gimmicks, but with a rock-solid, stackable approach to hauling tools, fasteners, and oddball jobsite essentials that actually survives Canadian weather and commutes. This in-depth guide walks through what Milwaukee Packout is, how to build a loadout that suits your work and your vehicle, real-world pricing and where to buy in Canada, comparisons with competing systems, and practical tips on mounting, maintenance, and theft prevention. Expect hard-won advice, not fluff—and examples tailored to the realities north of the 49th.
What the Milwaukee Packout System Is—and Why Canadians Keep Choosing It
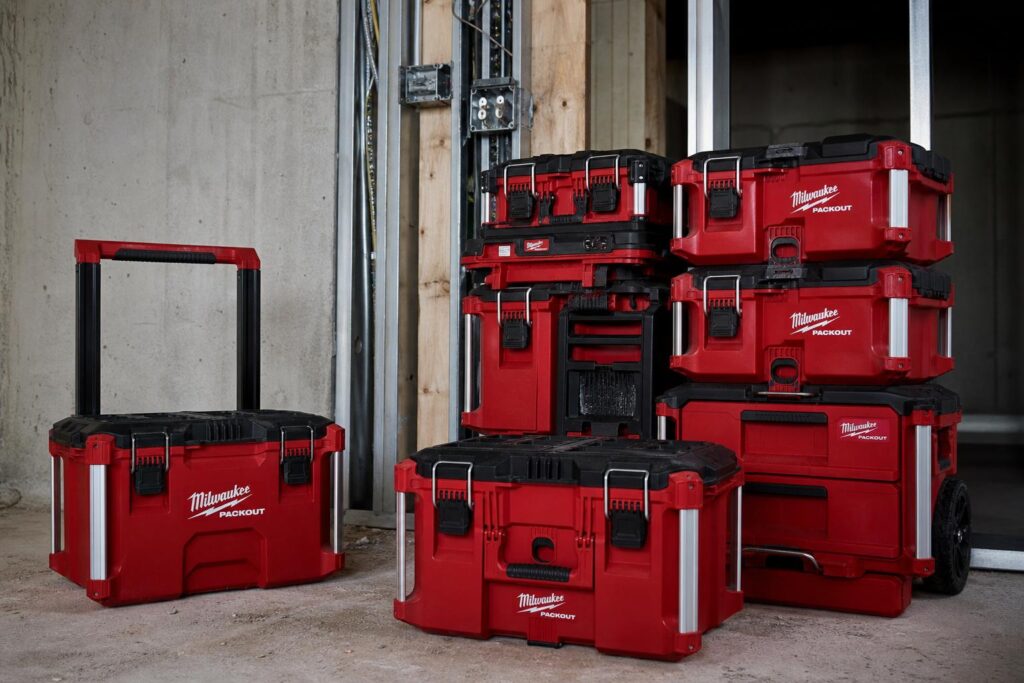
At its core, milwaukee packout is a modular tool storage ecosystem built around locking cleats. Every box, organizer, drawer, tote, and accessory clicks into the next, then releases with a push of a large red tab. That cleat geometry is the secret sauce: it lets you build custom stacks that can be rolled across a slushy site, carried up a narrow heritage-house staircase, or clicked onto a van wall plate without drama. Milwaukee didn’t invent the idea of stackable toolboxes—but they made it feel premium and dependable, with details that matter when the thermometer dives.
The hard cases and organizers typically use impact-resistant polymers, metal-reinforced corners or latches where needed, and an IP65-rated gasket on the sealed boxes. IP65 means dust-tight and protected against low-pressure water jets—translate that to “fine with blowing snow, rain, and spring jobsite mud, not a dry-bag you can toss in the lake.” Lids close with a positive snap even when you’re wearing gloves. Wheels are chunky enough to rumble over gravel. And the lineup is broad: rolling toolboxes, deep and shallow organizers, 2- and 3-drawer modules, open crates, soft totes, backpacks, a radio/charger, lights, a Packout vacuum, dollies, two-wheel carts, a cooler, even a shop wall system.
Why does this click in Canada specifically? Because commute distances are long, weather is vicious, and a lot of work happens out of vans, pickups, and cramped service elevators. If your storage can’t do ice, salt, and speed bumps, it fails. Packout’s IP65 seals and rigid shells hold up. The modularity lets you split a tall stack into two shorter carries when a snowbank or three-storey walk-up gets in the way. And because it’s popular here, parts, accessories, and replacements are easy to find nationally.
The Core Components of a Packout Loadout
Milwaukee Packout isn’t one box—it’s an ecosystem. It helps to break it down into categories before you build your setup.
Base Units: The Foundation You Roll, Push, or Click Onto
Start with something that moves. The classic Rolling Toolbox is the go-to base for many trades. It’s a large, IP65-sealed chest with all-terrain wheels and a telescoping handle. The wide stance handles a tall stack and doesn’t feel tippy when you cross a parking lot cratered with frozen ruts. It also has mounting points for padlocks and cable locks—handy for quick breaks at a downtown site where theft is a fact of life.
If you haul heavier loads or more bulk material, the Packout Dolly and Packout 2-Wheel Cart are worth a look. The dolly is a low platform on casters that lets you wheel a stack into a garage, shop, or apartment hallway with less lifting. The two-wheel cart takes the pressure off your back when you’ve got drawers full of screws or a compressor lashed on. Both have Packout cleats on top for secure stacking.
There’s also a compact rolling chest that trades overall volume for a smaller footprint—useful in elevators or narrow condo corridors. Whichever you choose, pick the base first; it dictates how tall you can go, how wide you can stack, and how far you can reasonably travel over ice, grass, or gravel.
Toolboxes and Organizers: The Workhorses
The standard toolboxes come in multiple sizes (XL, large, compact) and feel like individualized trunks for your core tools. They’re great for saws, rotary hammers, plumbing repair kits, or your “main bucket” of hand tools. Because they’re sealed, they protect meters and electronics better than an open tote in sleet or blowing dust.
Organizers are where the magic of true modular storage shows up. The classic Packout organizer with a clear lid and removable bins is a favourite for fasteners, wire nuts, PEX crimp rings, tap and die sets, or heat-shrink. Low-profile organizers are thinner and excellent for small electrical components, O-rings, and blades. Deep organizers handle larger fittings and plumbing valves. The lids interlock with the bins to prevent migration—a big deal when you bounce across a frozen jobsite and don’t want #8 x 1-1/4” screws marrying #10 washers.
Drawers take organization further by letting you access contents without unstacking everything above. A 2-drawer or 3-drawer module with adjustable dividers is ideal for trim carpenters, cabinet installers, and anyone who works from a service cart. In a shop or van, drawers mounted halfway up a stack save countless minutes every day.
Crates and Open Totes: When You Need Fast Grab Access
Open crates are polarizing—you either love them or think they look messy. They’re brilliant for bulky, dry items that don’t need sealing: rags, shims, clamps, spur-of-the-moment demolition gear. Because they’re open, you can see at a glance if you’ve got the pipe wrench or left it in the last unit.
Soft storage—totes and backpacks designed to clip onto Packout—offer quick access to hand tools and test gear. The Packout backpack is popular with service electricians and building engineers who live in mechanical rooms and on ladders. A tote as the top module makes sense when you bounce between tasks all day and don’t want to keep opening latches.
Power, Lighting, and Specialty Modules
The Packout radio/charger doubles as jobsite entertainment and a power station; the Packout light/charger brings area lighting that travels with your stack and charges batteries while you work. The Packout vacuum turns the system into a cleanup station that rolls where you do—useful for service calls in finished spaces where dust control matters. These powered units are designed for jobsite abuse, but they’re electronics: they appreciate a sealed base box beneath them in slush season, and a dry ride home when the rain turns sideways.
Shop and Vehicle Storage: Wall Plates, Cabinets, and Racking
Milwaukee’s Packout shop storage lineup includes wall-mount plates that accept any Packout module, plus purpose-built cabinets, shelves, hooks, and holders for paper towels, screwdrivers, and batteries. The wall plates are the anchor—mount them to studs or a backer board and your mobile boxes become modular shop drawers overnight. For vans and trailers, the same plates let you click stacks securely onto the wall. This is where Packout shifts from “nice set of boxes” to “integrated system” that streamlines both transport and workflow.
How to Design a Packout Setup That Actually Works
Slow down and plan before you buy. A Milwaukee Packout tower that looks impressive in a thumbnail can be a nuisance in a third-floor walk-up if you don’t think through access, weight, and workflow. Here’s a simple approach that holds up across trades.
Step 1: Audit and Group by Frequency
Sort your tools and consumables by how often you use them, not by category. Daily reach? Top or front access. Weekly? Mid-stack. Rare? Bottom. This sounds obvious, but most disorganized setups come from building by brand or tool type instead of frequency. If you’re an electrician, your daily reach might be strippers, meters, fish tapes, wirenuts, and staples. A plumber might prioritize torch, tips, solder, paste, PEX tools, and fittings. A finish carpenter might put layout, fasteners, and blades higher than routers that only come out for specific tasks.
Try a quick 5S pass: sort, set in order, shine, standardize, and sustain. Toss dead drivers. Combine three half-empty boxes of 2-1/2” screws into one. Standardize labels. The Packout system rewards this discipline with faster setups and fewer lost bits.
Step 2: Pick Your Mobility Base for Real Life, Not Instagram
Choose the base unit for the ground you actually cover. If you wheel across parking lots, the rolling toolbox wins. If you’re often in high-rises with good elevators, a two-wheel cart with a taller stack is fine. If you load in and out of a pickup bed several times a day, a dolly or compact rolling base is easier to lift. In snow country, wider wheels matter more than you think; narrow casters dig in and make you work twice as hard.
Step 3: Decide Drawers vs Organizers vs Open Totes
Drawers shine when you need frequent access without dismantling a stack. They weigh more than a simple organizer but pay you back every hour. Organizers with clear lids are brilliant for small parts and make inventory counts painless. Open totes sit best at the top for instant grab. Mix to suit your workflow: an HVAC tech might run drawers (fasteners, fittings), an organizer (gaskets, caps, nozzles), then a tote (hand tools) at the top.
Step 4: Label Everything (Twice)
Label the face of each box and the underside of the lid. Use a durable labeler (laminated tapes hold up well in cold) and standardized names: “ELEC-FASTENERS,” “PEX-CRIMPS,” “MISC-HVAC-VALVES.” If you run bilingual crews in Quebec, label in English and French to avoid confusion. Coloured dividers or bin colours help non-English readers and apprentices learn the system quickly.
Step 5: Build in Security and Tracking
Use the padlock points on hard boxes when you leave stacks at site, and add a cable lock through the rolling base handle to something immovable for lunch runs. Many Canadians tuck an AirTag or Tile inside a foam cutout in a drawer; it won’t stop a theft, but it can help police and insurance. Photograph your stack with serial numbers and keep receipts. Some contractors engrave a business name into the inside of lids or onto metal latches. None of this is overkill in a busy city core or hotel job.
Loadout Blueprints for Popular Canadian Trades
Every trade stacks their world differently. These blueprints are starting points—steal them, adapt them, and ignore what doesn’t fit your day.
Electrician: High-Rise and Service Work
Day-to-day life: tight service elevators, strict condo boards, loading docks that hate loose debris. You need clean, compact, and quiet. Start with a compact rolling base. Add a 3-drawer for small hardware and terminations, a low-profile organizer for wirenuts, butt splices, and ferrules, then a sealed large toolbox with meters, testers, and hand tools. A top tote for hand tools saves seconds at each panel. Keep a second organizer dedicated to devices (receptacles, switches, GFCIs) that you can swap in and out depending on the tickets that day. This keeps your stack light enough for awkward elevators and steep parking ramps.
Canada-specific touches: a dedicated bin for tamper-resistant receptacles (often required in residential work), GFCI and AFCI testers rated for local standards, and bilingual “lockout/tagout” labels if you’re working in Quebec or with national clients. In older Toronto buildings, bring rubber-pad casters or use the dolly on finished floors to keep superintendents happy.
Plumber/HVAC: Winter-Proof and Service-Ready
Life happens in basements, mechanical rooms, and outdoor equipment pads. Snow and freezing rain are constants. Use a rolling toolbox base with sealed boxes above; keep anything that hates moisture (gauges, electronics) in IP65-sealed modules. A deep organizer for PEX fittings and copper sweat fittings, a second for press sleeves or crimps, and a third for service valves reduces rummaging. A drawer module holds screws, anchors, and hangers. Keep propane/MAP gas upright and separated from ignition sources; don’t bury torches under a mess of metal parts. For filters and larger items, an open crate on top makes sense, but throw a contractor bag over it in sleet.
Canada-specific touches: in Calgary or Winnipeg cold snaps, store CO2 cartridges and aerosols in a sealed box in the cab overnight; extreme cold can affect performance. Toss a slip-resistant mat in a bottom organizer for wet boots and gloves to avoid dripping onto electrical modules.
Carpenter and Installer: Drawers Are Your Friend
Trim, cabinets, flooring—precision parts and a need for fast access. Start with a dolly or rolling toolbox, then two drawer modules for fasteners, biscuits, dominos, hinges, slides, and hardware. A low-profile organizer for blades, bits, and small layout tools sits above. Seal a compact toolbox for routers, domino cutters, or sanders to keep dust off sensitive gear. In occupied homes, the Packout vacuum clips into the stack for quick cleanup and client-friendly optics. Your stack becomes your portable shop cart; keep it neat and supervisors stop asking questions.
Automotive/Mobile Mechanic: Salt, Water, and Flexibility
In coastal cities like Halifax or winter on the Prairies, salt and slush eat metal. Use sealed organizers for sockets, terminals, and electronics. An open crate or tote for oily rags and fluids stays at the top with a drip tray beneath. Throw a desiccant pack into sealed boxes with electronics to fight condensation. The two-wheel cart handles heavier drawers and a small compressor strapped with accessories for mobile tire or suspension work.
Homeowner/DIY and Cottage Life: Mix-and-Match Without Overkill
Don’t buy a skyscraper of boxes you’ll resent lifting. A compact rolling base, one sealed toolbox for power tools, a clear-lid organizer for fasteners, and a tote for hand tools will carry 90% of household projects. If you’re a cottager on a lake, remember: IP65 laughs at rain, not submersion. Keep the stack in the boathouse, not the dock edge. A Packout light/charger makes evening deck repairs civilized.
Price Ranges in Canada and Where to Buy
Milwaukee Packout is widely stocked across Canada, from national chains to independent pro dealers. Prices vary by province, currency swings, and promos. As a ballpark, these are typical street price ranges in Canadian dollars as seen in 2023–2024 at authorized retailers. Taxes are extra unless noted.
| Packout Component | Typical CAD Price Range (2023–2024) | Notes |
|---|---|---|
| Rolling Toolbox (base) | $200–$260 | Most popular base for outdoor sites |
| Dolly / 2-Wheel Cart | $120–$220 / $230–$350 | Cart carries heavier stacks; dolly is low and nimble |
| Large / Compact Toolboxes | $110–$180 | IP65 seals, metal-reinforced features |
| Organizers (standard, low-profile, deep) | $60–$120 | Clear lids; removable bins |
| 2-Drawer / 3-Drawer Modules | $180–$300 | Includes adjustable dividers |
| Open Crate / Soft Tote / Backpack | $70–$180 | Great for bulky items or grab-and-go |
| Radio/Charger | $350–$500 | Audio + battery charging |
| Light/Charger | $250–$380 | Area light that locks into stacks |
| Packout Vacuum | $300–$450 | Jobsite cleanup on wheels |
| Wall Mounting Plates | $50–$100 | For vans, trailers, and shops |
Where to buy? Home Depot Canada carries a deep selection in-store and online. You’ll also find strong stock at authorized independent dealers nationwide, including KMS Tools (BC/AB), Atlas Machinery (Toronto), BC Fasteners & Tools, Ottawa Fastener Supply, and Federated Tool (London, ON). Many local industrial supply houses across the Prairies and Atlantic Canada handle Milwaukee Packout as well—check Milwaukee’s dealer locator to ensure you’re buying from an authorized source with valid Canadian warranty support.
Sales are common around Father’s Day, Black Friday, and year-end contractor promos. Bundles sometimes throw in organizers or wall plates. Watch for “Buy More, Save More” events that discount multiple items on a single receipt. If you’re running a crew across multiple provinces, ask for contractor pricing at pro desks—it adds up fast when you standardize a fleet of stacks.
Milwaukee Packout vs. Other Modular Systems Sold in Canada
There are worthy competitors. The decision isn’t always brand loyalty; it’s how a system fits your workflow, weather, and vehicle. Here’s a point-in-time comparison to anchor your research.
| System | Strengths | Considerations | Canadian Availability (2023–2024) |
|---|---|---|---|
| Milwaukee Packout | Broadest ecosystem; IP65 seals on hard cases; robust cleats; drawers; shop wall system; powered modules | Premium pricing; weight of drawers; lots of tempting add-ons | Excellent at national chains and pro dealers |
| DeWalt ToughSystem 2.0 | Durable IP65 boxes; good value; van racking options; available widely | Fewer powered Packout-style modules; different drawer approach | Strong presence at big-box and pro dealers |
| Ridgid Pro Gear (System 2/3) | Good price-to-performance; sturdy rolling base | Smaller ecosystem; fewer specialty modules; availability varies | Available at select national retailers |
| Husky Connect/Pro | Budget-friendly; decent organizers | Limited module variety; not a pro-grade ecosystem | Primarily at big-box retailers |
Cross-compatibility? Don’t count on it. Locking geometries are brand-specific. If you choose Milwaukee Packout, you’re choosing the ecosystem—stick with it to keep your setup clean and expandable over time.
Weather, Abuse, and Longevity: Packout in Canadian Conditions
IP ratings, polymer claims, and marketing are one thing. Ice, road salt, and daily handling are another. Here’s how Packout holds up—and how to help it last longer.
Cold weather: impact-resistant polymers don’t turn into eggshells at -20°C, but everything gets stiffer. Give latches a firm, square press. If you’re working in -30°C windchill on the Prairies, avoid slamming lids or yanking on frozen gaskets; a minute in a warm cab can save a gasket. Silicone-safe protectants on seals once or twice a season keep them supple.
Salt and slush: rinse exterior salt off occasionally, especially around metal latches, axles, and fasteners. A quick hose-down (don’t aim directly into seals) followed by a towel dry goes a long way. In coastal cities like Vancouver or Halifax, salt spray isn’t just for winter; add a wipe-down to your Friday wrap-up.
Dust: on construction sites, fine dust can cake gaskets. Wipe gasket tracks clean periodically to maintain IP65 performance. When you see dust on the inside of a sealed organizer lid, it’s a hint to clean and re-seat the gasket rather than crank latches tighter.
UV and storage: boxes live longer out of direct sun. If your truck bed is uncovered, throw a light-coloured tarp over stacks to reduce heat and UV exposure in summer. Electronics—radio, lights—prefer a dry ride home. Treat them like the jobsite equipment they are, not as indestructible bricks.
Vehicle and Shop Mounting, the Right Way
Packout wall plates turn a jumble of boxes into a clean, secured racking system for vans, trailers, and garages. Done well, this makes loading, unloading, and inventory easier. Done poorly, you’ll chase rattles and regret it. Follow a few principles.
- Use proper backing. In a van, mount plates to plywood that’s securely fastened to ribs or to a purpose-built racking frame. Don’t bolt plates directly through thin sheet metal without reinforcement—vibration will win.
- Fastener choice matters. Use through-bolts with large washers or rivnuts rated for the loads you carry. Wood shops? Lag into studs or use structural screws into a sheet of 3/4” plywood backer.
- Plan heights. Set top plates low enough that you can click boxes on without a step stool, especially in trailers. Leave room to lift modules off without scraping the roof liner.
- Cargo securement rules. Commercial users should be aware of Canada’s National Safety Code Standard 10 (Cargo Securement). In short: if a failure could send your load flying in a hard stop, it needs proper restraint. Packout cleats are secure, but they’re not a substitute for tie-downs where regulations require them. Add straps for heavy stacks.
- Weight distribution. Keep heavy drawers low and forward of the axle in trailers. In pickups, tighter to the cab is better than perched on a tailgate. Your future self on a snowy off-ramp will thank you.
Security, Insurance, and Preventing Heartbreak
Theft happens. You can’t eliminate it, but you can lower the odds and smooth insurance claims.
- Never leave a stack visible in an open truck bed overnight. If you have to, run a heavy cable lock through the rolling base handle and a tie-down. It’s not perfect, but it raises the effort.
- Mark it. Paint pen or engrave your company name and phone inside lids, not just on the exterior. Thieves often scrape outside markings first.
- Track it. Hide a small tracker in foam under a divider or in a battery compartment of a dead tool. Keep receipts and serial numbers in a cloud folder.
- Insurance. Photograph your full setup. Some Canadian business policies require proof of forced entry for theft claims from vehicles—read your policy and plan accordingly.
Care, Maintenance, and Small Upgrades
Keeping a milwaukee packout stack at its best doesn’t take much.
- Cleaning: mild soap and water, soft brush on gaskets, and a rinse. Avoid solvent cleaners that can haze clear lids or degrade seals.
- Lubrication: a silicone-based spray on latches and gasket tracks twice a year is enough. Wipe excess to avoid dust buildup.
- Repairs: Milwaukee and dealers can source replacement latches, wheels, and bins. Don’t bin a whole box for a $10 part.
- Foam inserts: for delicate tools, custom foam (often called kaizen foam) keeps things from rattling. Many Canadian shops sell pre-cut Packout-compatible foam. A sharp knife and some patience gives a tidy, pro look.
- Tops and work surfaces: several third-party and DIY solutions add a plywood or phenolic top to a crate or box for an impromptu bench. Great in condos where you can’t bring in a full workstation.
Common Mistakes (and How to Dodge Them)
The biggest errors aren’t dramatic. They’re small choices that compound into frustration.
- Too tall, too soon. A five-high tower looks great in a catalogue. On stairs, it’s a wrestling match. Build shorter, smarter stacks and make two trips.
- Ignoring weight. Drawers full of screws weigh a ton. Keep dense items low. Your back will notice immediately.
- Mixing categories in one organizer. Don’t pack electrical and plumbing bits in the same lid. When you need to grab-and-go for a specific task, you’ll always be missing something.
- Skipping labels. You will think you’ll remember what’s in that box. Next month, you won’t.
- Treating IP65 like submarine-grade. Wet is fine. Submerged isn’t. Don’t leave boxes half-buried in a slush berm beside the truck bed.
Future-Proofing Your System
Milwaukee keeps expanding the Packout lineup while sticking to the same cleat design. That’s the bet to make: what you buy today will click into tomorrow’s add-ons. Practical tips:
- Standardize heights where possible so stacks swap between vehicles and shops without rework.
- Leave one organizer or tote “open” as a flex module for job-specific gear. It keeps you from creating random, unlabeled one-offs.
- Build with 80% of your daily needs in mind. The remaining 20% should live in swap-in modules you keep on the van wall or shop rack.
Three Canadian Mini Case Studies
Toronto Service Electrician: Condo and Retail
Base: compact rolling chest. Middle: 3-drawer for fasteners and terminations. Above: low-profile organizer with labelled bins for wirenuts, Wagos, and ferrules. Top: open tote for hand tools. On the van wall: a second organizer for devices, and a sealed box with meters and sensitive electronics. Why it works: elevator-friendly, quiet on finished floors, and the drawers save unstacking in tight janitor closets behind retail spaces.
Calgary HVAC Tech: Rooftops and Mechanical Rooms
Base: rolling toolbox for weather resistance. Middle: 2-drawer for screws, anchors, zip ties. Above: deep organizer for flare nuts, Schrader cores, caps, and seals. Add: Packout vacuum for quick cleanup in finished spaces, and a light/charger for dim mechanical rooms. Why it works: weather-ready, everything strapped down for wind on rooftops, and fast access to small parts without tearing apart stacks in the snow.
Halifax Mobile Mechanic: Coastal Corrosion Control
Base: two-wheel cart—heavier loads move easier. Middle: sealed organizers for terminals, fuses, sensors. Above: open crate for rags and absorbents with a plastic drip tray. Why it works: sealed where it matters, open where wet is okay, and a cart that handles weight without chewing up shoulders on salty sidewalks.
Advanced Tips That Save Real Time
- Bin discipline: dedicate one organizer to “consumables to reorder” and toss the last of anything into it when you hit a threshold. End of week, reorder from your supplier. No more jobsite surprises.
- Colour coding: a strip of coloured electrical tape on the front of each box by trade or function—blue for plumbing, yellow for electrical, green for carpentry—speeds ID in the dark.
- Night loading: pack the next day’s top tote before you leave site. Tomorrow-you won’t have to think.
- Seasonal swap: keep a winter and summer swap-in module (ice melt, gloves, toque; or sunscreen, bug spray, spare water) ready on the van wall. Click in as seasons flip.
Warranty, Support, and Buying Smart in Canada
Milwaukee offers limited warranties on Packout components; hard plastic storage typically carries a limited lifetime warranty against defects, while powered Packout units like the radio/charger or lights have multi-year limited warranties specific to the product category. In Canada, warranty service runs through authorized dealers and service centres—proof of purchase matters. Keep your receipts, especially if you buy during promos. As always, check the current Canadian warranty terms on Milwaukee’s official site because they can vary by product and change over time.
A quick word on grey-market imports: avoid them. If it looks too cheap, it might bypass Canadian distribution and cause warranty headaches. Buy from recognized Canadian retailers or directly from Milwaukee’s Canadian partners to ensure proper support.
Sustainability and Waste Reduction, Practically
No storage system is “green” on its own—it’s plastic. But a tidy modular ecosystem helps you buy smarter and waste less. When every fastener has a labelled bin, you don’t panic-buy duplicates. Durability means fewer cracked totes in the landfill each spring. If a latch breaks, replace the part, not the box. And if you’re replacing a motley collection of bins and bags, donate usable ones to community workshops or school programs rather than tossing them.
Milwaukee Packout Shopping Checklist
Before you head to the store or click “add to cart,” run through this quick list.
- Base chosen for your terrain (rolling toolbox vs dolly vs two-wheel cart)
- Two sealed boxes sized to your biggest tools (saws, meters, routers)
- At least one clear-lid organizer for small parts (two is better: split by trade)
- One drawer module if you hate unstacking for hardware
- Top tote or backpack for hand tools
- Wall plates if you’re mounting in a van, trailer, or shop
- Labels and dividers (buy extras; you’ll want to tweak)
- Padlock and cable lock for urban work
- Tracker if theft risk is high
- Silicone spray for seasonal maintenance
FAQ: Milwaukee Packout in Canada
Are Milwaukee Packout boxes waterproof?
They’re IP65 rated, which means dust-tight and resistant to low-pressure water jets. Rain, snow, and splashes are fine. Submersion isn’t. Don’t treat them like dry bags for boating or leave them sitting in meltwater deep enough to reach the gasket line.
Where can I buy Milwaukee Packout in Canada?
Home Depot Canada, KMS Tools, Atlas Machinery, BC Fasteners & Tools, Ottawa Fastener Supply, Federated Tool, and many authorized industrial dealers nationwide. For warranty support and authentic parts, stick to authorized sellers and check stock online before you drive.
Is Milwaukee Packout compatible with other brands’ systems?
No. Each brand uses its own locking geometry. You can store other brands’ tools inside Packout boxes, of course, but you can’t stack different systems together securely.
How does Packout handle Canadian winters?
Very well overall. The plastics and gaskets hold up to cold, the wheels roll through slush, and IP65 seals protect contents from snow and road spray. Treat latches and gaskets gently in extreme cold, and give electronics a dry ride when possible.
What’s the warranty in Canada?
Hard Packout storage typically carries a limited lifetime warranty against defects, while powered modules (radio/charger, light/charger) come with product-specific limited warranties. Keep your receipt and confirm current Canadian terms on Milwaukee’s website or at an authorized dealer.
Can I mount Packout in a work van legally?
Yes—use Packout wall plates attached securely to a proper backer or racking. For commercial vehicles, ensure loads are secured per cargo securement rules (National Safety Code Standard 10). Heavy stacks should be additionally strapped; Packout cleats aren’t a replacement for required tie-downs in a sudden stop.
Are Packout drawers worth it?
If you access small parts constantly, yes. Drawers save you from unstacking boxes dozens of times a day. They’re heavier than organizers, so keep them low in the stack.
What about the Packout radio and light—are they just gimmicks?
Not if you value fewer separate things to carry. The radio/charger powers the day and charges batteries; the light/charger fills dim rooms with even light while topping off packs. Both lock into your stack, so you’re less likely to forget them in a rush.
How do I keep small parts from migrating between bins?
Use genuine Packout organizers with the clear lids that compress each bin. Keep bins filled below the rim so the lid can seal against bin walls. For powders or very fine items, add small zip bags inside bins.
What’s a smart starter setup for a homeowner?
A compact rolling base, one sealed toolbox for drills and saws, one clear-lid organizer for fasteners and anchors, and a tote for hand tools. You can add drawers or more organizers later as projects grow.
What’s the difference between Packout and DeWalt ToughSystem 2.0?
Both are rugged, stackable, and IP65-rated. Packout’s ecosystem is broader, especially with powered modules and shop wall storage, and its cleat feel is very positive. ToughSystem 2.0 often comes in at a lower price and has its own racking solutions. If you’re already invested in one brand’s batteries and accessories, that can tip the scales.
Will Packout fit in condo elevators?
Usually, yes—especially if you choose the compact rolling base or keep stacks to three or four modules. For very tight or historic buildings, measure elevator doors and choose a two-trip approach with lighter stacks to avoid dings and awkward corners.
How do I label Packout boxes so the labels don’t peel in the cold?
Use laminated label tapes or industrial-grade vinyl, apply at room temperature to a clean, dry surface, and press firmly. Wipe with isopropyl alcohol before applying. For Quebec or bilingual crews, add French and English to avoid confusion.
Are there counterfeit Packout products?
Counterfeit or grey-market items do pop up online. If a price is wildly low or the seller seems vague about origin, skip it. Buy from authorized Canadian dealers to protect your warranty and safety.
Final Word
Milwaukee Packout earns its place on Canadian jobsites because it respects the work: tough materials, smart access, and a system that grows with you. Build a stack around your actual day, label it like you mean it, and mount it properly in your vehicle or shop. Get those basics right and you’ll wonder how much time you used to waste chasing a 5mm Allen key through a sea of loose parts. In a country where the weather never takes a shift off, that kind of dependable order isn’t just nice—it’s money in the bank.