
Ear Piercings in Canada: A Complete, Practical Guide to Types, Costs, Healing, and Real-World Care
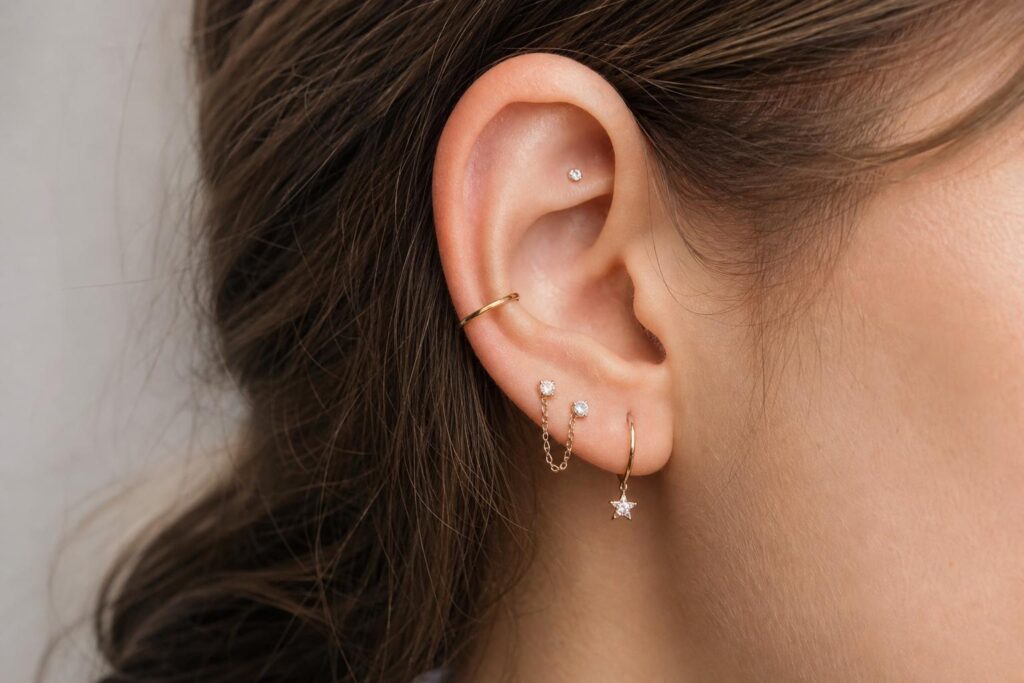
Walk into any coffee shop in Toronto, Calgary, or Halifax and you’ll see it: an endless parade of lobes, rings, and delicate gold sparks tucked along cartilage. Ear piercings are one of the most personal, low-commitment ways to express style in Canada, and they come with real choices—type of piercing, metal, studio, aftercare, price, and how to live with it through hockey helmets, winter hats, and lake season. This guide gives you straight answers, Canadian context, and useful detail you can act on today.
We’ll break down ear anatomy so you choose piercings that heal well on your ear. We’ll compare the most popular options (helix, conch, tragus, daith, rook, industrial, and more), what they cost in Canadian dollars, and how long they take to settle. We’ll show you what safe studios look like under Canadian public health rules, why a sterile needle beats a piercing gun, and how to keep your new piercing happy when the temperature hits -20°C or you’re swimming in a Muskoka lake. You’ll also get troubleshooting help, clear aftercare, and no-nonsense talk about risks like nickel allergy and cartilage infections. Let’s make your ear project both beautiful and uneventful.
Why ear piercings are so popular—and how to pick yours with confidence
Ear piercings are versatile. You can keep them understated for a conservative office or stack them into a full, curated ear. They’re relatively affordable compared to tattoos or major jewelry, and most can be removed without a trace if you change your mind. That mix of flexibility and instant style explains why they’re common from Vancouver to St. John’s.
Picking the right piercing starts with two realities: your anatomy and your lifestyle. Not every ear has the same ridges, thickness, or fold depth. A deep conch can carry a bold ring; a pronounced rook ridge invites a beautiful curved bar. On the other hand, a flat or thin helix might not hold a heavy hoop comfortably. Lifestyle matters too: cyclists and hockey players wrestle with helmets, nurses and lab workers face PPE constraints, and swimmers deal with bacteria-rich water. A skilled piercer will work with both factors, not force a trend that won’t heal on your ear or fit your life.
Ear anatomy 101 (in plain language)
Your ear is mostly cartilage wrapped in thin skin, except for the soft lobe. Cartilage doesn’t have its own blood supply like skin and muscle do, so it heals slowly. That’s why helix, conch, rook, tragus, and other cartilage piercings take months (not weeks) to fully settle. The lobe, rich in blood flow, typically calms down faster.
A few landmarks matter for ear piercings:
- Lobe: the soft, fleshy base. Heals fastest, easy to pierce and style.
- Helix: the outer rim of cartilage. Very popular for studs or hoops.
- Forward helix/flat: the front rim near your face (forward helix) and the flat plane where that rim meets the head (often called “flat”). Great spots for dainty studs.
- Tragus: the small flap covering the ear canal. Small anatomy means careful jewelry sizing.
- Conch: the bowl of the ear (inner or outer conch). Rings around the rim or flat-back studs work here.
- Daith: the fold just above the ear canal opening. Anatomy varies; some ears can’t accommodate it safely.
- Rook: the ridge above the daith. Curved barbells fit best.
- Snug and anti-tragus: advanced options that demand robust cartilage and patient aftercare.
- Industrial: a straight barbell connecting two cartilage piercings, usually through the upper ear. High-impact look, longer healing.
Good piercers map these landmarks carefully on your unique ear. Tiny changes in angle or placement make big differences in comfort, healing, and look.
Types of ear piercings: what they are, who they suit, and how they heal
Below you’ll find the most common ear piercings in Canada, including healing timelines, typical jewelry, and what daily life with each is actually like. Prices shown later are in Canadian dollars.
Lobe and stacked lobes
The classic. Lobes are the friendliest place to start: generous blood supply, lower pain, and a vast jewelry selection. Stacked lobes (first, second, even third holes) remain popular because they’re easy to curate. Lobes usually start with flat-back studs or small hoops, though a flat-back stud tends to be more comfortable for sleeping during early healing.
Healing: initial tenderness 2–4 weeks; functional healing around 6–8 weeks; full maturity 3–6 months. You’ll likely change to shorter “downsized” jewelry at 4–8 weeks to prevent catching.
Upper lobe
This sits where lobe meets cartilage. It acts like a bridge between lobe and helix styles but can heal more like cartilage if your tissue thins. It’s a safe step up if you want the look of a helix without the full cartilage commitment.
Healing: 2–3 months if more lobe tissue, longer if piercing passes into cartilage.
Helix (standard, double, triple)
The outer rim is a blank canvas for subtle studs or minimalist rings. Double and triple helix lines look sharp but consider healing load: two fresh piercings on the same side equal more swelling and longer patience.
Healing: 6–12 months. Rings move more and can slow healing; many piercers start with a stud for stability, then swap to a ring after a few months.
Forward helix
At the front rim near your face, forward helix piercings create sparkling clusters that frame your features. Anatomy is the limiting factor; a tight fold may not accept two or three in a row. These can be finicky if you wear over-ear headphones or sunglasses often.
Healing: 6–9 months. Threadless or internally threaded flat-back studs are standard.
Flat
Set on the upper “flat” plane inside the helix rim, flat piercings lend themselves to constellations of tiny gold or gemstone ends. A good piercer will angle placement to avoid pressure from sleep or hats.
Healing: 6–12 months. Avoid pressure and snagging during winter hat season.
Conch (inner or outer)
The conch is the ear’s bowl. An inner conch usually starts with a flat-back stud; an outer conch can eventually take a ring that hugs the ear. People love the bold look of a conch ring, but many ears heal faster if you start with a stud and switch to a ring after several months.
Healing: 6–12 months. A ring will brush hair and masks, so factor in your routine.
Tragus
That small flap near the ear canal is surprisingly sturdy. It’s subtle and stylish, but a tight tragus can be tricky to pierce. Earbuds and in-ear monitors can irritate it during healing, so plan on over-ear headphones for a while.
Healing: 6–12 months. Jewelry must be precisely sized to avoid sinking or catching.
Daith
Set in the fold just above the ear canal, the daith is striking with a snug ring or clicker. Not all ears have enough fold to pierce safely. You’ll see claims that a daith piercing helps migraines; evidence doesn’t support it as a treatment. If you love the look, go for the aesthetic—just don’t treat it as medicine.
Healing: 6–12 months. Extra care around masks and headphones is wise.
Rook
The rook sits above the daith through a crisp ridge of cartilage. A curved barbell reduces pressure and friction compared to a ring during healing. This one is beautiful but fussy if you’re a side sleeper.
Healing: 6–12 months. Avoid sleeping on it (use a travel pillow for side-sleeping).
Snug
An advanced cartilage piercing across the rim toward the ear canal. It’s anatomy-dependent and tends to be temperamental. If a piercer declines, they’re protecting you from a bad outcome, not gatekeeping style.
Healing: 9–12+ months. Only for those willing to baby it.
Anti-tragus
Across from the tragus, above the lobe. Lovely when your ear is built for it; impossible when it isn’t. Expect patience and precise jewelry sizing.
Healing: 6–12 months.
Industrial (scaffold)
A straight barbell connecting two upper-ear piercings. Noticeable and architectural, but it’s a higher-maintenance heal since both points must behave and the bar can catch on hats, hoods, and hair. Many studios in Canada recommend starting with two separate studs to let tissue settle, then connecting them later if your anatomy and healing allow.
Healing: 9–12+ months. Choose a piercer experienced with industrials.
Costs in Canada: what ear piercings really cost (and why)
Studios price piercings in two parts: the service fee and the jewelry. Taxes apply (GST/HST/PST varies by province). Jewelry quality drives overall cost more than the piercing itself. Implant-grade titanium and solid 14k/18k gold cost more but are safer for sensitive ears and new piercings.
Below are typical Canadian price ranges as of this year. Expect higher pricing at premium studios in major cities and lower ranges in smaller markets. Always confirm whether the price includes a follow-up downsizing appointment; many studios charge separately.
| Piercing Type | Service Fee (CAD) | Starter Jewelry (CAD) | Typical Total (before tax) |
|---|---|---|---|
| Lobe (per ear) | $40–$80 | $30–$200+ | $70–$280+ |
| Upper Lobe | $40–$80 | $30–$200+ | $70–$280+ |
| Helix (per piercing) | $50–$90 | $40–$220+ | $90–$310+ |
| Forward Helix / Flat | $60–$100 | $40–$220+ | $100–$320+ |
| Conch | $60–$100 | $50–$240+ | $110–$340+ |
| Tragus | $60–$100 | $50–$240+ | $110–$340+ |
| Daith | $70–$110 | $60–$260+ | $130–$370+ |
| Rook | $60–$100 | $50–$240+ | $110–$340+ |
| Snug / Anti-Tragus | $70–$120 | $60–$260+ | $130–$380+ |
| Industrial (two piercings) | $80–$140 | $60–$280+ | $140–$420+ |
Notes:
- Canadian sales taxes vary. Ontario charges HST (13%); BC has GST (5%) plus PST (7%) on some services; Quebec applies GST and QST. Confirm before you budget.
- Tipping: It’s common but optional. Many people tip 10–20% of the service fee for good work, similar to hair or nails.
- Downsizing: Some studios include one downsizing within 6–8 weeks; others charge $10–$30 plus any replacement jewelry.
How to choose a safe piercing studio in Canada
Any studio can take nice photos. Safety lives behind the scenes. Canada regulates “personal service settings” to varying degrees across provinces and municipalities. Infection control is the core focus: cleaning, disinfection, sterilization, and proper handling of sharps. Here’s how to judge a studio’s standards when you walk in.
What to look for, step by step
- Clean, organized workspace: Treatment area should be uncluttered, with wipeable surfaces, handwashing sink, and sharps container.
- Single-use, sterile needles: Individually packaged and opened in front of you. Needles are never reused.
- Autoclave sterilization: Tools that aren’t single-use should be bagged in sterilization pouches with indicator strips. Studios should be able to show you biological spore test logs (typically done at least monthly) verifying the autoclave works. Many public health units in Canada expect or check this.
- Implant-grade jewelry: Ask to see documentation. Safe options include implant-grade titanium (ASTM F-136 or ISO 5832-3), solid 14k/18k gold (nickel-free, not gold-plated), niobium, and platinum. Avoid mystery metals and sterling silver for new piercings.
- Gloves and hygiene: Fresh gloves for setup and piercing, with changes after touching unclean surfaces. Skin prep with an appropriate antiseptic.
- Clear aftercare instructions: You should leave with written guidance and a way to contact the studio.
Know your local rules (without drowning in legalese)
Public health oversight differs by location. For example, Ontario has a dedicated Personal Service Settings regulation under the Health Protection and Promotion Act (O. Reg. 136/18) that sets infection-control requirements for shops offering body piercing. Other provinces regulate personal service establishments through health acts and guidelines administered by regional health authorities (for instance, Alberta Health Services and BC’s health authorities publish standards for sterilization, record-keeping, and sanitation). Municipalities may add their own bylaws or inspection programs.
In plain terms: reputable studios across Canada operate under public health expectations for sterilization, record-keeping, and safe procedures. Many welcome inspections and display certificates. You can usually check a studio’s inspection status on your local public health website (e.g., Toronto Public Health’s DineSafe includes personal service settings; other cities publish similar reports or will confirm by phone).
Needle vs. piercing gun: why it matters
Stud guns are common in mall kiosks, but they’re not designed for cartilage and can traumatize tissue even in lobes. They drive blunt studs through skin with force, create more swelling, and can’t be reliably sterilized in an autoclave. That’s why many Canadian public health units and professional piercers discourage or restrict their use, particularly for cartilage. A sterile, single-use needle is precise, minimizes crushing, and allows high-quality jewelry with smooth internal threading or threadless posts. If you care about healing well, choose a needle-based studio.
Red flags
- No autoclave (or unwillingness to show logs or indicator strips).
- Unlabeled jewelry materials or push-back butterfly earrings used for fresh piercings.
- Reusing needles or tools without pouching and sterilization.
- Vague aftercare (“just clean with alcohol”) or advice to twist/rotate jewelry.
- Hard sell tactics on jewelry with unknown alloys.
Before your appointment: prepare like a pro
Small steps make a big difference the day of your piercing. You’ll bleed less, feel better, and heal more smoothly if you do the basics right.
- Eat within 2–3 hours of your appointment. A stable blood sugar helps prevent lightheadedness.
- Hydrate and avoid alcohol or cannabis beforehand; both can increase bleeding and impair judgment.
- Avoid aspirin beforehand; talk to your healthcare provider before changing any prescribed medications. If you’re on blood thinners, disclose it to your piercer and consider consulting your clinician.
- Consider acetaminophen (Tylenol) an hour before if you’re anxious about discomfort. Avoid ibuprofen if your provider advises against it, as NSAIDs can increase bleeding; for most healthy people a standard dose is fine, but it’s optional.
- Bring valid photo ID. Many Canadian studios require it even for adults. For minors, studios typically require a parent or legal guardian with matching ID and may request a birth certificate or other proof of guardianship.
- Tie back hair, avoid heavy makeup around ears, and wear a zip-up hoodie or buttoned shirt so you don’t pull clothing over a fresh piercing.
- Mention any medical factors: keloid history, diabetes, immunosuppression, isotretinoin (Accutane) use in the past 6 months, pregnancy, or recent antibiotics for ear infections. Some of these increase risk or slow healing.
The appointment, step by step
Here’s what a professional ear piercing with a needle typically looks like in a Canadian studio:
- Consultation and anatomy check: You’ll discuss goals, lifestyle, and anatomy. A good piercer will tell you what will and won’t work on your ear and suggest jewelry sizing and placements.
- Jewelry selection: You’ll choose implant-grade titanium, solid gold, niobium, or platinum. Flat-back studs or rings depending on the location and plan.
- Setup and sterilization: The piercer lays out sterile tools and single-use needle packs, preps an aseptic field, and washes or sanitizes hands before gloving.
- Skin prep and marking: Antiseptic clean (commonly chlorhexidine or iodine; alcohol may be used on lobes). Placement is marked and shown to you in a mirror.
- The piercing: A quick breath in, then out as the needle passes through. Jewelry follows immediately. Expect pressure and a short, sharp pinch.
- Aftercare instructions and payment: You’ll get a written guide and a plan for follow-up, including downsizing if needed.
It’s normal to feel a flush of adrenaline. Sit a moment before standing. If you feel woozy, say so; they deal with this all the time.
Aftercare that works in real life (and Canadian weather)
Aftercare should be simple, consistent, and gentle. Ear piercings don’t heal faster when you do more; they heal faster when you do less, but correctly.
The core routine
- Clean with sterile saline once or twice daily. Look for sterile 0.9% saline wound wash (no additives). Spray, then let air-dry or gently pat with clean gauze.
- If you can’t find sterile saline, mix your own only if necessary: dissolve 1/4 teaspoon non-iodized sea salt in 1 cup (250 mL) of freshly boiled, then cooled water. Make a fresh batch daily. Sterile products are easier and safer.
- Hands off. Do not twist or rotate jewelry. Movement disrupts healing tissue.
- Shower normally. Rinse soap/shampoo thoroughly from the area. Avoid soaking in tubs during early healing.
- Sleep smart. Use a travel pillow or donut pillow to keep pressure off cartilage piercings. Change pillowcases frequently.
- Hair and hats: Keep hair away and be careful with toques and scarves in winter; friction irritates cartilage and can cause bumps.
What to avoid
- Alcohol, hydrogen peroxide, witch hazel, and ointments like petroleum jelly. They’re too harsh or occlusive.
- Swimming in pools, hot tubs, lakes, and oceans for the first 2–4 weeks (longer for cartilage if you can). If you do swim later, rinse with clean water then saline promptly. Hot tubs are the highest risk.
- Sleeping on the fresh side for at least a few weeks. Pressure is the biggest cause of cartilage irritation.
- Over-ear or in-ear headphones rubbing the site. Use the other ear or speakers temporarily.
- Makeup, sunscreen, and hair products directly on a fresh piercing.
Downsizing and jewelry changes
Swelling peaks in the first week or two, which is why initial posts are longer. As swelling reduces, a long post can snag and irritate tissue. Most studios recommend a “downsize” to a shorter post around 4–8 weeks for lobes and 8–12+ weeks for cartilage, depending on your healing. Don’t rush. If you feel constant movement or pressure, book a check-in.
Changing to a ring: ask your piercer. Rings move more and often delay healing; many people wait 3–6 months for cartilage before switching. If you’re aiming for a daith or conch ring, plan a stud first, then convert later for a smoother ride.
Healing timelines at a glance
- Lobe: functional in 6–8 weeks; mature in 3–6 months.
- Upper lobe: 2–3 months if mostly lobe tissue; longer if cartilage.
- Helix/flat/forward helix: 6–12 months.
- Conch/tragus/daith/rook: 6–12 months.
- Snug/anti-tragus/industrial: 9–12+ months.
“Functional” means you can reduce cleaning frequency and everyday life gets easier. “Mature” means the channel has stabilized. Everyone’s body is different—cold, dry winters, hats, and PPE can add months for cartilage. Patience pays.
Common problems and how to fix them (without making things worse)
Most bumps are irritation, not infection. Knowing the difference saves you time and stress.
Irritation bump vs. infection vs. keloid
- Irritation bump: Pink or red raised bump at the piercing entry or exit, often triggered by pressure (sleeping on it), snags, tight backs, over-cleaning, or low-quality metal. It may weep clear lymph. Solution: remove pressure (sleep aids, hat caution), switch to implant-grade jewelry if not already, avoid over-cleaning, and book a check with your piercer. Warm saline compresses can soothe.
- Infection: Increasing redness, heat, throbbing pain, pus (yellow/green), fever, or spreading redness. For lobes, see a clinician or walk-in clinic if those signs appear. For cartilage, act sooner: cartilage infections (perichondritis) can escalate faster and risk deformity. Don’t remove jewelry unless a clinician instructs you; it can trap infection.
- Keloid: A firm, shiny overgrowth that extends beyond the original piercing margins. Keloids are less common than people think. Family history raises risk, and they’re more frequent in darker skin tones, but anyone can develop them. See a dermatologist for diagnosis and treatment (often steroid injections). Do not pierce again in the same site if you’ve had a keloid there.
Allergic reactions and nickel sensitivity
If your ears itch, burn, or develop a rash that improves when the jewelry is removed, contact dermatitis is likely. Nickel is the biggest offender. Choose implant-grade titanium, niobium, or solid 14k/18k gold from reputable makers. Avoid “surgical steel” unless it’s high-quality with low nickel release and approved for initial piercings by your piercer; even then, titanium is a safer bet for sensitive ears. Sterling silver tarnishes and should not be used for fresh piercings.
Embedded backs, swelling, and other emergencies
Severe swelling can sink a back into tissue, especially with traditional butterfly backs used in mall piercings. This is painful and needs professional help. Go back to your piercer or to a clinic to safely remove it—don’t dig. If the ear looks distorted, purple, or you’re worried about circulation, seek urgent care.
Jewelry: materials, sizes, and closures that make life easier
Good jewelry is not a luxury in fresh ear piercings—it’s basic wound care. The wrong metal or size is the fastest route to bumps and prolonged healing.
Safe materials for new piercings
- Implant-grade titanium (ASTM F-136 or ISO 5832-3): Hypoallergenic, lightweight, and nickel-free. A go-to for sensitive skin.
- Niobium: Inert and nickel-free; slightly heavier than titanium, available in anodized colours.
- Solid 14k or 18k gold: Make sure it’s solid, not plated or gold-filled, and verify low-nickel alloys. White gold should be nickel-free or avoided in new piercings.
- Platinum: Excellent but expensive.
Avoid: sterling silver (tarnishes), mystery base metals, cheap fashion jewelry, and anything plated for initial wear. Ask for documentation or reputable brands; quality jewelry will have verifiable specs.
Gauges, lengths, and diameters
- Gauge: Lower numbers are thicker. Lobes often start at 20g (0.8 mm) or 18g (1.0 mm); cartilage often at 16g (1.2 mm). Thicker posts can be more stable for cartilage.
- Length: Initial studs are longer to accommodate swelling; downsizing later reduces snagging.
- Rings: Diameter must clear anatomy without pinching. Too small equals pressure; too large equals movement and irritation.
Closures and styles
- Threadless (push-pin) flat-back studs: Smooth, secure, and easy to adjust. Great for most ear piercings.
- Internally threaded studs: Threads are on the jewelry end, not the post, so they don’t scrape the piercing channel.
- Seam rings and clickers: Clean silhouette. For fresh cartilage, many piercers prefer a stud first, then a ring later.
- Captive bead rings (CBR): Classic, but more movement. Choose carefully during healing.
In winter, flat-backs are kind under toques and scarves. In summer, rings shine—but save them for later if you want an easier heal.
Minors and consent in Canada: what parents and teens should know
Age and consent rules for ear piercings vary by province and sometimes by municipality, and many studios set stricter policies than the law requires. Across Canada, studios commonly require a parent or legal guardian to be present for minors, with matching government-issued ID, and may set different age minimums for lobes versus cartilage.
Here are general patterns (not legal advice; always check your local studio and public health unit):
- Ontario: Personal Service Settings are regulated for infection control (O. Reg. 136/18), but there’s no province-wide minimum age law specific to ear piercings. Studios set their own age and consent policies.
- British Columbia and Alberta: Regulated through public health authorities; age rules are typically studio policy. Written consent for minors is commonly required.
- Quebec: Consent for minors follows the Civil Code and professional practice norms. Many studios require parental consent up to a certain age, and some municipalities may have local requirements.
- Atlantic provinces and the Prairies: Public health regulations cover sanitation and permits; most studios require parental consent for minors and may set higher minimum ages for cartilage.
- Territories: Health authorities publish guidance; studios often align with southern provincial norms on consent and age.
For young children, choose a patient, needle-based piercer who works with kids, schedule a calm time of day, and only proceed if the child genuinely wants the piercing. Piercings can be scary; a good studio will happily pause or reschedule.
Living with new ear piercings in Canada: work, sports, and seasons
Life doesn’t stop for a fresh helix. Think ahead and your ear will thank you.
- Workplaces: Many Canadian offices are relaxed about ear piercings, but healthcare, food production, and lab settings may restrict jewelry or require retainers. Fresh piercings shouldn’t be removed; plan timing around rotations or training periods.
- Sports: Hockey, skiing, cycling, and climbing helmets press on cartilage. Either pierce off-season or pick placements away from contact points. Ask your piercer to mark with your helmet on if needed.
- Winter: Toques, ear muffs, and scarves rub. Choose flat-backs, wear looser hats, and keep fabric clean. Dry indoor air can slow healing; saline and gentle care help.
- Summer: Lakes and hot tubs tempt you in June. Hold off a few weeks, then rinse and saline after any swim. Sunscreen should avoid fresh piercings; apply carefully around them.
Trends, curated ears, and what looks good long-term
The “curated ear” trend—balancing multiple piercings into a cohesive look—works best when it respects your anatomy. Instead of collecting piercings at random, plan with a studio that maps a full layout: lobes and upper lobes as anchors, a conch stud or ring for impact, and small helix or flat studs to add spark. Fewer well-placed piercings heal faster and look more intentional than many scattered ones.
Ask yourself: do you mostly wear gold or silver tones? Do you want a bold ring or a minimal line of studs? What side do you sleep on? Does your job allow visible jewelry? Considering these now prevents future frustration.
Needle-pierced lobes vs. gun-pierced lobes: the real-world difference
Many Canadians had their first ear piercings at a mall kiosk with a spring-loaded device. For new piercings today—especially cartilage—seek a needle. Why?
- Cleanliness: Needles arrive sterile in sealed pouches; gun studs aren’t sterile the same way, and the device can’t be autoclaved.
- Tissue trauma: A sharp needle creates a clean channel; a blunt stud tears through, causing extra swelling.
- Jewelry quality: Needles allow implant-grade jewelry with secure flat-backs sized for you. Guns use one-size-fits-most butterfly-backed studs that can embed in swelling.
If you already have old gun-pierced lobes, don’t worry. Just choose better jewelry going forward and treat future piercings to a needle.
Special note on daith piercings and migraines
You’ll hear that a daith piercing helps migraines. Research to date doesn’t support a daith as a reliable migraine treatment. Some individuals report feeling better, but that may be placebo or unrelated improvement. If migraines are your concern, talk to a healthcare provider for evidence-based treatment. If you want a daith for style, enjoy it—but don’t rely on it medically.
Stretching lobes safely (if you’re curious later)
If you think you may eventually want stretched lobes, tell your piercer. Starting at 16g or 14g can make gradual stretching safer. Stretch in tiny increments (usually 1 mm at a time) with long waits—months, not weeks—between sizes. Use smooth, implant-grade jewelry and never force a taper through pain. Healthy tissue first, size second.
Where to get ear piercings in Canada (and how to evaluate options)
Canada has excellent studios in every major city and many smaller towns. Instead of chasing a name, use a method:
- Search for Association of Professional Piercers (APP) members or studios that follow APP-aligned practices. Many Canadian studios are members or adhere to the same standards.
- Check your regional public health inspection reports (e.g., Toronto, Ottawa, Winnipeg, Calgary, Edmonton, Vancouver, Victoria, Montreal, Halifax). If not posted, call the health unit.
- Look at healed photos in the studio’s portfolio, not just fresh piercings. Healed results tell you more about placement skill.
- Read aftercare policies and follow-up support. A studio that invites check-ins wants you to heal well.
Cities like Toronto, Vancouver, Montreal, Calgary, Edmonton, Ottawa, Winnipeg, Quebec City, Halifax, and Victoria all have multiple reputable, needle-based studios with implant-grade jewelry. If you’re in a smaller community, consider a day trip; it’s worth it for a piercer who values anatomy and sterilization.
What doctors and public health wish everyone knew about ear piercings
Two points come up again and again in Canadian clinics:
- Cartilage infections are uncommon but serious. If your cartilage piercing becomes very red, hot, and increasingly painful, seek care promptly—especially if you’ve been in hot tubs or lakes. Don’t remove the jewelry unless a clinician advises it.
- Nickel sensitivity is common. If you’ve struggled with “sensitive ears,” invest in implant-grade titanium or solid gold from the start. It’s cheaper than months of bumps and replacements.
Myths to leave behind
- Rotating jewelry prevents sticking. False. Rotation tears healing tissue.
- Alcohol or peroxide kills germs better. They also kill healing cells and delay recovery.
- Tea tree oil fixes bumps. It’s harsh and can worsen irritation. Saline and pressure reduction work better.
- All bumps are infection. Many are pressure or metal irritation. Get a professional opinion before starting antibiotics.
A quick decision guide: which ear piercings fit your life?
- Minimalist, low maintenance: single or double lobe, upper lobe, a single helix stud.
- Curated but office-friendly: stacked lobes with small gold studs, one conch stud, a delicate flat stud.
- Bold statement: conch ring (added later), industrial (if anatomy allows), multiple helix with a mix of textures.
- Helmet-heavy sport: lobes and lower placements away from pressure zones; wait on rook/industrial.
- Headphone addict: skip tragus and forward helix until you can avoid friction.
Ear piercing safety checklist (printable mentality)
- Studio uses single-use needles and has an autoclave with spore test logs.
- Jewelry is implant-grade titanium, niobium, or solid 14k/18k gold.
- No guns, no butterfly backs for new piercings.
- You received written aftercare; saline only, hands off, no rotation.
- Plan for downsizing and a follow-up check.
- Schedule around helmets, swimming, and big events.
Frequently asked questions
How painful are ear piercings, really?
Pain is quick and varies by location. Lobes are a 2–3 out of 10 for most people. Helix, conch, tragus, rook, and daith feel sharper—often a 4–6—followed by warmth and pressure for a minute. Good breathing, a skilled piercer, and correct jewelry sizing make the biggest difference.
How long before I can sleep on a new cartilage piercing?
Wait at least a few weeks; many people need 2–3 months before side-sleeping without irritation. Use a travel pillow to offload pressure sooner. If a bump appears, return to back-sleeping on a normal pillow and let it rest.
Can I bring my own earrings to the appointment?
Usually not for initial piercings. Fresh piercings require sterilized, implant-grade jewelry of specific sizes. Many studios will happily install your own jewelry later once you’re healed, provided it’s quality and can be sterilized.
When can I change my earrings?
For lobes, many people change at 6–8 weeks with a piercer’s approval, often into a shorter post. For cartilage, plan on several months before any change, and even then it’s best done by the studio to avoid trauma and incorrect sizing.
Is it safe to swim with new ear piercings?
Avoid pools, hot tubs, lakes, and oceans for 2–4 weeks minimum; cartilage benefits from waiting longer. If you swim later in healing, rinse with clean water and follow with saline. Hot tubs carry the highest infection risk.
What if my ear piercing looks infected?
Redness that’s spreading, heat, throbbing pain, pus, or fever suggests infection. For lobes, see a clinician or a walk-in clinic. For cartilage, seek care promptly—it can progress quickly. Don’t remove the jewelry unless a clinician instructs; it can trap infection inside.
I have “sensitive ears.” What metal should I choose?
Implant-grade titanium (ASTM F-136 or ISO 5832-3) is the most reliable choice. Niobium is also excellent. Solid 14k/18k gold from reputable makers is good for many people, but ensure low-nickel alloys (avoid nickel-heavy white gold).
Do ear piercings cause keloids?
Most bumps aren’t keloids. True keloids are overgrowths beyond the original wound, more likely if you have a family history. If you’ve had a keloid from a piercing before, avoid re-piercing in that area and consult a dermatologist before new piercings elsewhere.
Can I get an ear piercing while pregnant?
It’s generally not recommended. Pregnancy changes immune response and swelling patterns, and you’ll want to avoid unnecessary infection risks. Wait until after delivery and breastfeeding if advised by your healthcare provider.
Will my ear piercings set off airport security?
Unlikely. Most small jewelry passes without issue. If you need MRI imaging later, some facilities will require removal; ask your studio for non-magnetic options or be prepared to remove jewelry for the scan.
Should I tip my piercer in Canada?
It’s appreciated but voluntary. Many clients tip 10–20% of the service fee for attentive care, similar to salon norms. Focus first on choosing quality jewelry and proper aftercare; that’s the real investment.
Can I get multiple ear piercings in one session?
Yes, within reason. Two to three per ear is common, but more piercings equal more swelling and longer healing. If you wear helmets or sleep on your side, consider staggering appointments to reduce pressure.
Do I need numbing cream?
Topical anesthetics aren’t commonly used for ear piercings. They can distort tissue and complicate healing. The actual piercing is quick; calm breathing and an experienced piercer help far more than numbing creams.
Why is my cartilage piercing taking so long to heal?
Cartilage has limited blood supply and is sensitive to pressure and friction. Hats, headphones, masks, and side-sleeping prolong healing. Stick to saline, minimize pressure, use high-quality jewelry, and ask your piercer about downsizing at the right time.
Is it okay to use ear piercing guns for lobes?
A sterile needle with implant-grade jewelry is the safer, cleaner choice for both lobes and cartilage. Guns cause more tissue trauma and use jewelry that’s prone to embedding. If a studio uses guns, weigh that risk carefully.
What’s the best time of year to get ear piercings in Canada?
Whenever you can protect them. Many people prefer late spring or early fall to avoid winter hat friction and summer swimming. If you ski or play hockey, plan around your season and helmet pressure.
Can a daith piercing cure migraines?
No solid evidence supports daith piercings as a migraine treatment. Get a daith for the look, not as medical therapy. Speak with your healthcare provider for proven options.
What about children’s ear piercings?
If your child asks for ear piercings and you agree, choose a patient, needle-based studio that works with kids, bring proper ID, and schedule when you have time for aftercare. Make sure your child understands the cleaning routine and agrees to hands-off healing.
The bottom line
Ear piercings are small decisions with big personality. In Canada, your best experience starts with a needle-based studio that respects anatomy, uses implant-grade jewelry, follows public health standards, and supports you through aftercare and downsizing. Choose placements that fit your routine, budget for quality metal, treat your ear gently, and give cartilage the time it demands. Do that, and your ear will reward you with years of effortless shine—winter hats and hockey helmets included.